Install Docker
First off, you need to install docker on your local machine according to your platform, Here you can Get Docker and after installing it, make sure your docker is installed correctly check by running the docker-v command on cmd.
Create Next.js Application
Then you have to create the next.js application with a built-in docker file using this command.
//Note: This below command works only if you are creating next application from scratch otherwise if you want to implement docker on existing next application then you have to create the Dockerfile and .dockerignore file manually on the root folder of your project.
npx create-next-app -e with-docker
//here -e is suppose to be example with docker file
The above command will create your next application with built-in Dockerfile and .dockerignore file. The Dockerfile tells docker how to bundle your application or how to containerize it. Let me explain to you what the code in that file does.
First Stage
FROM node:18-alpine AS base
# Install dependencies only when needed
FROM base AS deps
RUN apk add --no-cache libc6-compat
WORKDIR /app

# Install dependencies based on the preferred package manager
COPY package.json yarn.lock* package-lock.json* pnpm-lock.yaml* ./
RUN \
  if [ -f yarn.lock ]; then yarn --frozen-lockfile; \
  elif [ -f package-lock.json ]; then npm ci; \
  elif [ -f pnpm-lock.yaml ]; then yarn global add pnpm && pnpm i --frozen-lockfile; \
  else echo "Lockfile not found." && exit 1; \
  fi
The above lines of code are the first stage of our multi-stage docker file in which we are using the Linux alpine distribution to install our dependencies so we copy over our package.json that lists all of the dependencies and run the yarn and freeze the yarn.lock file.
Second Stage
// Rebuild the source code only when needed
FROM node:alpine AS builder
WORKDIR /app
COPY --from=deps /app/node_modules ./node_modules
COPY . .
RUN yarn build
After the installation part, we come to the second stage where we are building the source code but only when needed, so again we are using the Linux alpine for its slimmer distribution we are copying over the dependencies and we run yarn build.
Final Stage
// Production image, copy all the files and run next
FROM node:alpine AS runner
WORKDIR /app
ENV NODE_ENV production

COPY --from=builder /app/public ./public
COPY --from=builder --chown=nextjs:nodejs /app/.next/standalone ./
COPY --from=builder --chown=nextjs:nodejs /app/.next/static ./.next/static

USER nextjs

EXPOSE 3000

ENV PORT 3000

CMD ["node", "server.js"]
Finally in the last stage of our Dockerfile we have the production image and we are calling our runner from Linux alpine. In the second line, we are going into our app directory and then telling it that it's our production build. Then in the below lines of code, we are copying over the files we need. After that, we are just simply exposing the port and the command that will start our application.
// Here I want to quickly mention that the npx create-next-app -e with-docker command will also generate the .dockerignore file which tells which things we don't need to include in our container.
Dockerfile
.dockerignore
node_modules
npm-debug.log
README.md
.next
.git
Build the image
After all the installation processes we are going to build our image in the container. So, now we have to open our terminal and run the docker build . -t nextjs-docker. Here we are creating our image with docker build and -t is indicating the tag with the image name nextjs-docker(you can name your image as per your choice).

It will download the relevant stuff like alpine distro, will install the yarn followed by the production build of our application and export that image locally on docker.

Then, open your docker desktop and you should see your created image as above.
Now when finally we have built our image we can use docker run and in this instance we have to pass our environment variable of port 3000 to our image of nextjs-docker so just open your terminal again and run this command docker run -e PORT=3000 nextjs-docker. Now, your application should be running on localhost:3000.
Install Google Cloud SDK
Since we have built our next.js docker image in the container we have to deploy it on the google cloud run which is a part of google cloud platform and for that first off you have to install google cloud sdk from this link so you can run gcloud commands from the terminal. After installing to ensure your installation is correct run this command gcloud -v and it should show you the google cloud version.
Create a project on Google Cloud
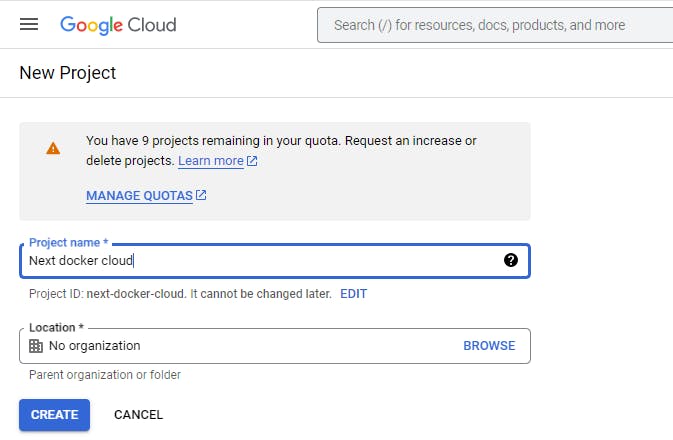
After installing the google cloud you have to create your new project just like the following image with with whatever name you want.

Now, after creating the project on google cloud run the gcloud auth login command for authentication. Also, you have to make sure the billing is enabled for your project because the google cloud platform is paid.
Create an image on Google Cloud
Next, we will create a container image of our application using google cloud build by running this command
gcloud builds submit --tag gcr.io/nextjs-with-docker-cloud/nextwithdocker --project next-docker-cloud

//here you just have to change your project name with my project name nextjs-with-docker-cloud and replace the project ID with yours after --project.
Deployment on Google Cloud
Then, it will create the docker container in the cloud so that we can use it in the cloud run. Now, finally, we will deploy our container to google cloud run by this command
gcloud run deploy --image gcr.io/nextjs-with-docker-cloud/nextwithdocker --project next-docker-cloud --platform managed

//here you just have to change your project name with my project name nextjs-with-docker-cloud and replace the project ID with yours after --project.
Then, it will go through you with some basic processes like specifying your region and all other basic questions and finally, it will deploy your next.js application docker container image to the google cloud run. You will see the URL, click on it and you should see your next.js application.
Tips
If you face such an error where your docker desktop app not running then make sure you have enabled your
Virtualizationin the BIOS.If you face an error where you are not able to build your docker image then make sure your Hyper-V is enabled.
So, that's it from this guide. For any query please reach out to me on LinkedIn.
